
As a 3D printing enthusiast for almost three years, I also have spent a fair amount of time troubleshooting different kinds of issues—whether it's dealing with warping, print failures, or strange adhesion problems. One of the most frustrating things to deal with is when prints start delaminating in the middle or simply refuse to stick to the build plate, no matter how many tweaks you make to the settings. This was the exact situation a customer of mine encountered with his GK3 Pro resin printer. The issue involved delamination and warping of prints, particularly in the center of the print. Despite extensive troubleshooting and adjustments, the problem persisted, leading the user to believe there was a defect with the printer’s build plate. Of course it’s not about build plate
Troubleshooting he had done before consulting us:
-
Re-leveling the Build Plat
-
Switching Resin
-
Adjusting Exposure Times: Both overexposure and underexposure
-
Adjusting Layer Heights: Both higher and lower
-
Tuning Lift Speeds and Z-Lift Heights
-
Increased Support Structures
-
Sanding the Build Plate With 1500-grit Sandpaper
-
Testing Three Different Slicers: One recommended by the printer manufacturer
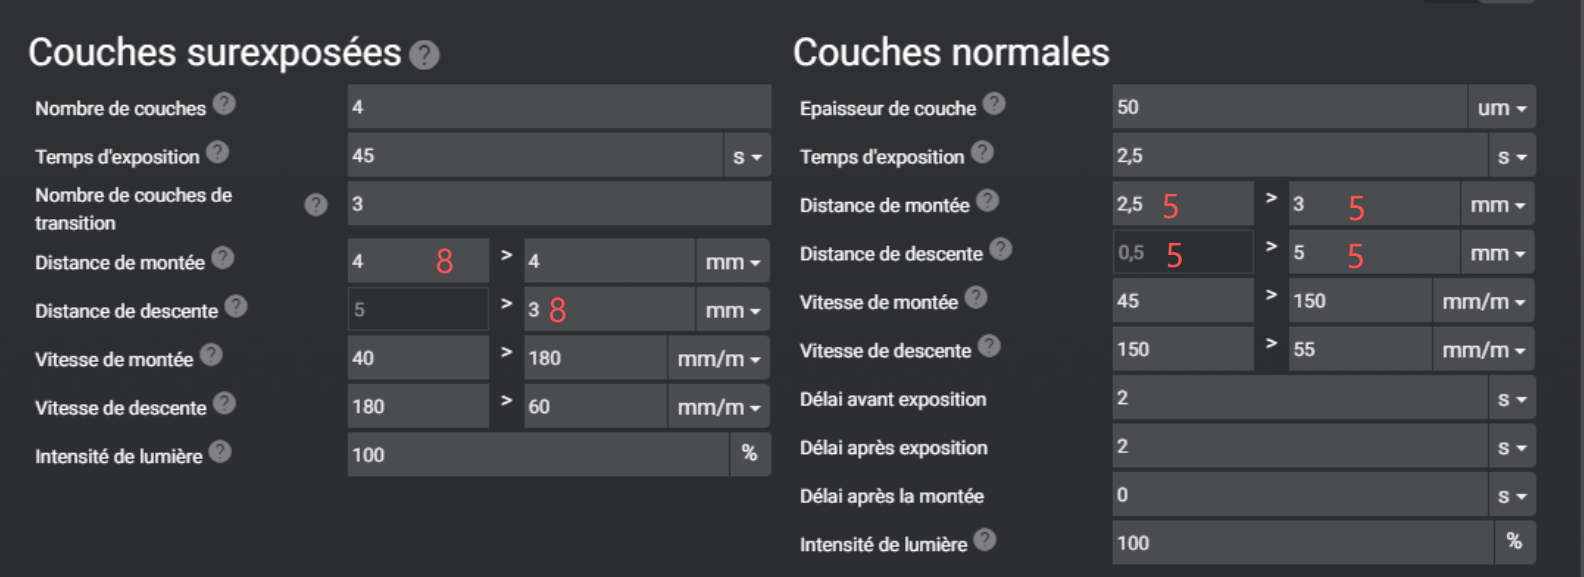
Based on this information, I initially determined that the print failure was likely due to insufficient lift distance, so I provided a recommended set of print parameters based on the resin he is using.
Finally, We also found that the CPFA had a hole, allowing resin to seep into the protective layer. Although we wasted a lot of time, we did it! I just got this good news.
"Vous pouvez fermer ma demande. Plus aucun soucis d'impression. Je ne sais pas si cela vient du changement du CPFA ou des nouveaux réglages, mais ça fonctionne nickel. Je viens de passer 2 L de résine depuis ce weekend et juste un loupé à cause de mes supports. Merci beaucoup pour votre aide."
"You can close my request now. No more printing issues. I'm not sure if it's because of the CPFA change or the new settings, but everything is working perfectly. I’ve used 2 liters of resin since this weekend, with just one failure due to my support. Thanks a lot for your help."
It hit me how crucial a proper troubleshooting process is. An effective inspection process can save you up to 30% of the time spent diagnosing print failures.
How to efficiently identify the cause of a printing failure yourself?
Before starting each print, it is crucial to ensure all necessary preparations are in place. These steps are also the first things to check when troubleshooting printing failures, not just with UniFormation printers, but with all LCD printers.
1、Check Resin Condition
If you feel resistance or scraping while stirring the resin, there may be cured residue in the resin tray. Empty the resin, filter it, and thoroughly clean the tray. Also, inspect the release film for wear. If the surface is rough, it needs to be replaced.
2、Check Heating Function
Ensure the heating function is turned on. Resin viscosity is highly sensitive to temperature. Significant temperature fluctuations can cause changes in resin shrinkage rate, potentially leading to layer lines or horizontal fractures in the model. At low temperatures, resin flow becomes sluggish, causing delayed reflow. This is a common cause of print failures in winter.
3、Check Exposure
Use the VAT Cleaning and Exposure Test functions to verify that the UV light projection pattern is complete, clear, and free of dark or bright spots. Ensure the screen protector is flat, securely attached, and free of wrinkles or heavy dirt, as any imperfections can affect leveling accuracy and imaging quality.
4、Inspect Release Film
When the release film shows persistent white haze, noticeable scratches, or creases, its release properties are degraded, making it harder to detach the model. This increases the risk of print failure and model damage. Replace it promptly.
5、Print Platform and Z-Axis Arm
-
Check if the print platform or Z-axis arm is loose, and ensure the resin tray is securely attached. Verify that the platform is not deformed or concave.
-
Check if the platform leveling screws are fixed properly, and make sure the platform does not move vertically.
-
Raise the Z-axis arm and check for any looseness.
6、Check Slice Settings
Check if the resin is underexposed. When switching to a different brand of resin, it’s best to refer to the slicing parameters for the official resin for your printer (such as lift speed, bottom layer exposure, etc.). Typically, only minor adjustments to the normal layer exposure time are needed.
💡 Related reading:
>>> Solutions for common layer separation issues faced by 3D printing beginners
Four Tips To Improve Print Success Rates
Exposure Time Strategy
Moderate Overexposure Principle: It is recommended to set the exposure time 0.3-0.5 seconds longer than the minimum successful time obtained from the exposure test model. This can effectively compensate for the risk of underexposure caused by uneven light intensity of the LCD screen, improving the overall success rate.
Model Placement and Support Strategy
-
Angled Placement: Place the model at an angle (typically 30-45°) to reduce the cross-sectional area of each layer and minimize the release force.
-
Important Surfaces Facing Up: Position the model with the most important surfaces, those requiring a smooth finish, facing upwards (away from the platform) to avoid leaving marks from the support points.
-
Conservative Support: When printing an unknown model for the first time, use a "conservative" strategy by increasing the support density and contact point diameter to ensure print success. Afterward, gradually optimize and reduce the support based on experience.
Hollowing and Ventilation Design for Models
-
Hollowing large models can significantly reduce the exposure area and release force for each layer while saving resin.
-
Hollow models must have at least two vent holes at the bottom (near the platform side) and inside closed cavities. The purpose of these holes is not only for "venting" but also to balance the internal and external air pressure, eliminating the "suction cup effect" that may occur during printing and preventing model damage or print failure.
Layer Thickness Selection Recommendations
-
Balanced Choice: 0.05mm layer thickness strikes the best balance between print speed and detail quality, suitable for the majority of models.
-
High Detail Requirement: For models that require exceptional surface quality, 0.03mm layer thickness is recommended.
- Avoid Thinner Layers: Layer thicknesses below 0.03mm significantly increase print time, with minimal improvement in visual detail, making them cost-inefficient


